Computer   Add Music to your Homepage!

This site offers 'hands-on' tutorials on software of interest to musicians and to people who wish to build their own website with music- and video content. All tutorials have been tested successfully on Windows XP, but as always, use it at your own risk. To simplify matters, I assume that all files are in the same directory on your server. If you store your files in different directories, make sure to include the paths.

To navigate this page, click on a title in the Table of Contents and to get back again click  

Table of Contents
                Getting started
                Using MIDI-OX
                Tuning the pipes
                Adding stops
                Creating your own organ
                Adding effect stops
                Playing Organ MIDI files through GrandOrgue
                Latency
                Links
speaker You are listening to Fugue No.1 in C BWV.846 by J.S.Bach.
To stop or start the music, click this button:

To use this player you must have Flash Player version 7 or higher installed and JavaScript activated

How to get yourself a website and to upload files:

   It is easy to get yourself a free website, but remember that most providers of free sites don't allow music- and video clips because they put too high a load on their servers. For about $5 a month you can get yourself a website without such restrictions, without banners and with more disk space for your media files.

  For uploading files to your server it is better to use a dedicated Ftp client like FileZilla (free), than the Publish Tool of a Web Editor. Most Ftp clients have the same user interface as Windows Explorer, with the left pane showing the files on your own computer and the right pane showing the files on the server. This makes it easy to upload files and to keep track of which files are on the server. Here is how to do:
You can read more about FileZilla in this tutorial

    The easiest way of creating and editing Web Pages is to use a Web Editor like KompoZer (free). It is a so-called 'WYSIWYG' Editor (What You See Is What You Get). You can learn about it in this tutorial.  If you need a more advanced Web Editor, you could consider The HTML Editor 2010 SE ($49) by CoffeeCup Software which supports HTML5 and CSS3.

  When you have created your homepage, you would probably like the code behind it to be without errors.  This will make sure that all browsers display it the way you intended, and that search engines give it high marks. A Web Editor like Kompozer usually doesn't make any errors, but it can (and often does) create HTML code with minor faults which calls for a warning. Also, it doesn't check your JavaScript and PHP code. The following five Validators are available online:
To use these Validators, open your page in Notepad and click Edit -> Select All and thereafter Edit -> Copy. Then paste your code in the online Validators and validate it.   

How to make a music video for the Internet:

   With the new video codec H.264/AVC you can make a music video with high sound quality and good video quality which streams at 1-2Mbps so that people with only a 2 Mbps Internet connection can enjoy it. Since music videos are normally shot indoors, you need a digital camcorder or camera which can record videos under low light conditions. Most modern digital cameras can do that. The problem is sound quality. To get good sound quality, you must record the music separately with a good digital sound recorder. Such recorders used to be very expensive, but this has changed. The Zoom H2 Recorder delivers near professional sound quality for a price around $150 and its 'little brother' Zoom H1 for around $100. Here is how to do:
Tip: If you don't need to record the audio and video separately, you could consider the Q3HD video recorder (~$300) which is basicly a Zoom audio recorder with added HD video capability.
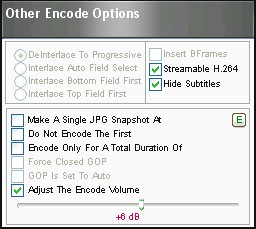
   A music video typically shows musicians playing. From a visual point of view this can get a bit boring after a while. Therefore it is common to 'spice up' a music video by overlaying still pictures (or video clips) on top of the video without interrupting the music. Let's say that you wish to overlay a still picture with a duration of 10 seconds on top of your video. Here is how to do: If your only audio source is the camera, you can do the same as explained in the foregoing by copying the audio track in the audio line and pasting it to the audio/music line

   It is customary to start a music video by giving the names of the piece, the composer and the artists. This can be done in many ways. Here is an example:
Save your video as highest quality on your computer. This should create a Windows media file with the name MyVideo.wmv.

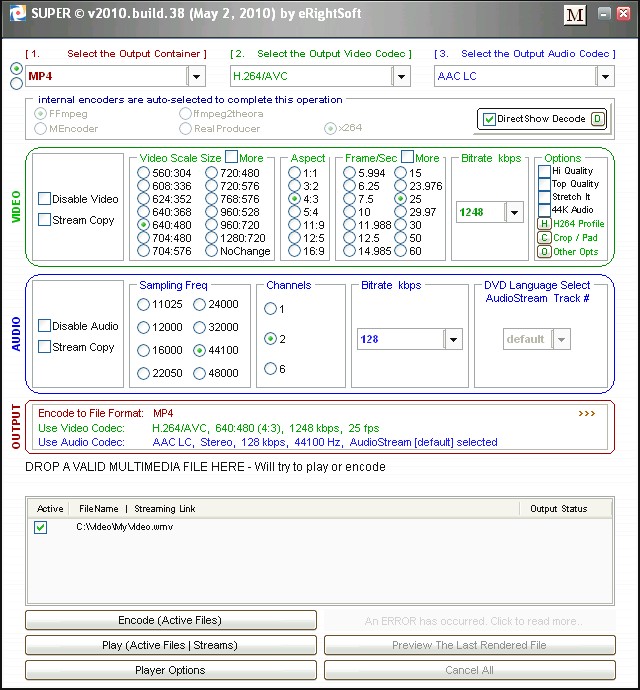
   The final step is to convert the video into a suitable format and upload it to the Internet:


The encoding will create the file MyVideo.wmv.mp4.  If you use the JW Player (described below ), you must (for purely technical reasons) rename the file extension from mp4 to flv so that your video becomes MyVideo.wmv.flv or just MyVideo.flv. Upload it to your server. The JW Player will recognize the H.264 codec and play your video if Adobes Flash Player vs. 9.0.98 or later is installed on your visitors computer (it is on 98% of all computers).

   If you upload your video to You Tube it is probably best to use the original file MyVideo.wmv. If you prefer to upload the H.264 compression of the video, you can keep the file extension .mp4. The above settings should work fine, read the official recommendations here.

How to stream MP3's and videos from your website with the JW Player:

   At present, the most reliable and satisfactory way of streaming music and video from a website is to use a Flash player embedded in the page itself . A good choice is the JW Player (free). It can stream both MP3`s and Flash videos (including H.264/AVC). It is flexible and easy to 'skin'. It can also play You Tube videos. The following tutorial is based on version 5.6:

<p id="placeholder">To use this media player you must have
Flash Player version 9 or higher installed and JavaScript activated.
</p>
      <script type="text/javascript" src="swfobject.js"></script>
      <script type="text/javascript">
var so = new SWFObject('player.swf','mpl','480','620','9');
so.addParam('allowfullscreen','true');
so.addParam('allowscriptaccess','always');
so.addParam('flashvars','config=MyConfigurationFile.xml');
so.write('placeholder');
      </script>

The numbers 480 and 620 are the total width and height in pixels of the player, including space for the controlbar and playlist. If later you need to change these numbers, open your page in Notepad and edit the code for the player. If you have multiple players on the same page they must have different id's so that placeholder becomes placeholder001, placeholder002 etc.

  The behavior and layout of the player is controlled by a number of  flashvars which can be set in a configuration file:

<config>
 
<file>MyPlaylist.xml</file>
<playlist>bottom</playlist>
<controlbar>bottom</controlbar>
<height>360</height>
<width>480</width>
<playlist.size>240</playlist.size>
<icons>true</icons>
<autostart>true</autostart>
<repeat>none</repeat>   
<volume>90</volume>

</config>


in Notepad and save it as MyConfigurationFile.xml. Upload it to your server. Whenever you wish to change the settings, you can edit it in Notepad
     .
Here is a brief description of the flashvars:
There are many more flashvars than listed above, read about them here.

   Let's say that you have created the MP3 MySong.mp3 and the video MyVideo.flv, which you want to play on your website:

<?xml version="1.0" encoding="utf-8"?>
<playlist version="1" xmlns="http://xspf.org/ns/0/">
<trackList>             

<track>

<title>My Song</title>
<annotation>text under the title</annotation>
<creator>name of creator/artist</creator>
<location>MySong.mp3</location>
<image>MyMp3Image.jpg</image>

</track>

<track>

<title>My Video</title>
<annotation>text under the title</annotation>
<creator>name of creator/artist</creator>
<location>MyVideo.flv</location>
<image>MyVideoImage.jpg</image>

</track>       
       
</trackList>
</playlist>


in Notepad and save it as MyPlaylist.xml. Upload it to your server. Not all of the skins (including the default one) displays the creator, so you may have to add it to annotation
   If you are not pleased with the default skin of the player you can download another one for free, buy one or create one yourself.  It is easy to install a new skin:
   If you only have one MP3: MyOnlySong.mp3 and only need a button to start and stop the music, then open your page in KompoZer and set the cursor at the place where you want the button player to be located. Click insert -> HTML and paste the text:

<div id="placeholder">To use this player you must have Flash Player version 9 or higher installed and JavaScript activated</div>
<script type="text/javascript" src="swfobject.js"></script>
<script type="text/javascript">
var so = new SWFObject('player.swf','mpl','23','23','9');
so.addParam('allowfullscreen','false');
so.addParam('allowscriptaccess','always');
so.addParam('flashvars','file=MyOnlySong.mp3&skin=simple.zip&autostart=true&repeat=none&volume=30');
so.write('placeholder');
</script>

Your button player should look like this:


   If you wish to play the MP3 MyBackgroundMusic.mp3 as background music without any visible controls, open your page in KompoZer and set the cursor wherever you like. Click insert -> HTML and paste this text

<div id="placeholder"> </div>
<script type="text/javascript" src="swfobject.js"></script>
<script type="text/javascript">
var so = new SWFObject('player.swf','mpl','0','0','9');
so.addParam('allowfullscreen','false');
so.addParam('allowscriptaccess','always');
so.addParam('flashvars','file=MyBackgroundMusic.mp3&autostart=true&repeat=always&volume=30');
so.write('placeholder');
</script>
 
  To play a video from You Tube in JW Player, do the following:
    There is a Forum where you can ask questions and get help.

How to stream videos from your website with the new video tag in HTML5:

   In the foregoing tutorial you have learned how to stream videos from your website using Flash. With the new video tag  in HTML5, video support can be handled by the browser itself without any third-party plugins. These are still early days for HTML5 support in Browsers, so don't expect too much. Internet Explorer for example, will only start to support HTML5 in version 9 which will not run on Windows XP (!).

   HTML5 is supported by the following web browsers: Firefox 3.5+, Chrome 3+,Safari 3+, Opera 10.5+, Internet Explorer 9, iPhone and Android. They all support one or both of the video codecs H.264 (.mp4) and Theora OGG . To support all browsers you must therefore convert your video into both formats. This is easily done with SUPER as explained in the tutorial above:

<video autoplay controls loop poster="MyImage.jpg" width="640" height="480">
<source src='MyVideo.mp4' type='video/mp4; codecs="mp4v.20.8, samr"'>
<source src='MyVideo.theora.ogg' type='video/ogg; codecs="theora, vorbis"'>
Your browser does not support the video element.
</video>

the numbers 640 and 480 are the size of the video window. The message: Your browser does not support the video element will be displayed if the web browser doesn't support HTML5. If you wish an image to be displayed in the video window when no video is playing, upload the image file MyImage.jpg to your server. The video element can have the following attributes:
Note that the element <source can be used to stack different file types, allowing the browser to try each in turn until it finds one that it can play. You can help the browser by suggesting a codec, but it is not necessary.

How to add MIDI music to your website:

   The traditional way of adding MIDI music to a website is as follows:

<embed src="MyMidi.mid" autostart="FALSE" loop="TRUE" width="200"   height="55">

If you don`t want the music to loop, replace TRUE with FALSE.

   If server space is not an issue, I suggest that you instead convert your MIDI into MP3, using your own soundfonts, and play it like explained above. This is because you don't know which MIDI soundfonts your audience is using and therefore your music may sound quite different from what you intended. Here is how to do: This will convert MyMidi.mid into MyMidi.mp3 with a superior sound quality. You can learn more about SynthFont in this tutorial.

Download the SynthFont plug-in: in_aSyFon for Winamp and put it in Winamp's plug-in directory. Then you can use Winamp to play MIDI's with your own soundfonts.

How to capture, trim and burn an H.264/AVC video stream from the Internet:

   As long as you only record Internet videos for your own personal use, it is perfectly legal. You will need a web recorder which can capture a video stream and a video editor which can trim/cut an H.264 transport stream without a time-consuming and lossy re-encoding of the whole video.

   Replay Media Catcher ($40) is one of the best web recorders for capturing streaming video. It can also figure out the names of the recorded files:
Replay Media Catcher can't capture all video files. The second best solution is to use a screen recorder. It doesn't capture the video file itself, but what is displayed on the screen (see the tutorial below).

   When you record a video stream from the Internet, you will usually need to trim the start and end of the video. You may also wish to cut out commercials and severe 'glitches'. It is easy to do this by converting the video into another format, but such a re-encoding is both time consuming and decreases the quality of the video significantly. At present, there are not many video editors which can trim/cut an H264/AVC transport stream without re-encoding it. Here is a selection of some of the most popular ones:
I suggest that you first to try out H264TS Cutter and if you are not pleased, download the other ones as trial versions.  

   Here is how to install H264TS Cutter:    To trim/cut a recording, do as follows: If you recorded a Flash video (FLV) instead of an H.264 video, use the program Avidemux (free) described below

   If you wish to burn the resulting files to a blank DVD which can be played on a regular DVD player, use a program like Free DVD Creator.  It is easy to use and relatively fast. It converts your mp4 files, makes a customized DVD menu and burns the result to a DVD. The label free should be taken with a grain of salt. Free DVD Creator is so-called 'annoyware' and after a while you must either register it for $20 or solve a math problem every time you use it! Business ethics aside, there is no question that this program is worth $20. It can process an H.264 transport stream which has been edited in H264TS Cutter without the audio and video getting out of sync,.and it is easy to create a fully customized DVD menu. Here is how to do:
Alternatively, you can convert your mp4 files into a DVD compliant format using SUPER (described above ), and burn them to a DVD using your favorite burning program. You could also consider dispensing with a DVD player all together, and instead store your mp4 files on a laptop (or iPod) and connect it to the TV with a video cable. Some Netbooks have an HDMI output and are able to show 1080 HD video on an HD TV. This is the trend of the future.

   You may also wish to record live Internet TV when you are away from the computer. The easiest way to schedule an automatic recording is to use a macro recorder (also called a mouse click recorder). It doesn't record sound or video, but the mouse- and keyboard activity on your computer. You record the mouse clicks and key-strokes which are necessary to start a TV recording, and schedule them to be played back at a later time when you are absent. There exist free mouse click recorders, but you may prefer to pay for a recorder which is easy to schedule. Here is how to do:  
In principle, Windows Task Scheduler can shut down your computer after the recording has finished, but you may find it easier to use a program like Mz Shutdown Scheduler (free).

How to capture an Internet video from your PC screen:

   
Internet Video Providers are slowly but surely catching on to the ways their files can be captured and are taking steps to prevent it. Meanwhile, the software developers have not been sitting idle. They have developed screen recorders which don't record the file itself, but what is displayed on the screen (or part of it). They are the modern digital equivalent to video tape recorders. They vary greatly in quality but are steadily getting better.

   The screen recorder liteCam ($34) automatically detects the sound card on your computer. It also reserves video overlay so that it is possible to capture screens properly even with full hardware acceleration. This results in better recording performance.
liteCam records in the format Avi but it comes with a video converter which can convert the video into a number of other formats.

   When you have recorded a video from the Internet, you usually need to trim the start and end of the video. You may also want to cut out commercials and severe 'glitches'. The program Avidemux (free) can trim/cut an Avi video recorded by liteCam without re-encoding it. This saves time and prevents loss of video quality. Here is how to do:
There is a tutorial on Avidemux here.

As an alternative to Avidemux, you could consider the program VirtualDub (free).

How to record music from a MIDI keyboard:

   If your sound card or motherboard has a game port, you can connect it to your MIDI keyboard with a standard MIDI cable. Today, most computers no longer come equipped with such a game port, so instead you must get MIDI into your computer through the USB port. If your keyboard doesn't have a USB interface, then get a plug-and-play USB-MIDI interface like MIDIMATE (~$30). It is a cable with a built-in USB-MIDI interface which is bus-powered and uses the native drivers in Windows XP, so no installation is needed. If you have a Logitech web camera installed, there may be a driver conflict which makes the MIDI port invisible, see this link to learn how to resolve it.

To record MIDI from your keyboard you also need a MIDI sequencer. A good choice is Logic Fun vers. 4.8 (free) which is a powerful yet easy to use sequencer/notation program and comes with a 256 page manual (!)

   If you don't need to edit, but only to record the MIDI file, you can use the program MIDI-OX (free) instead of a MIDI sequencer: If you have problems with latency (the time lag between hitting a key on the keyboard and the sound coming out of the speakers), see below for how to resolve it.
 
How to mix a microphone recording with a MIDI accompaniment:

   If you play an instrument other than the piano, you may wish to mix a microphone recording of your instrument with a MIDI accompaniment. To do this you need three programs: a MIDI sequencer, a MIDI synthesizer and a Wave Editor:
Upload the file MyConcert.mp3 to your server and play it like explained above.

How to record surround sound with the Zoom H2 Recorder:

   Until recently, surround sound recording was only for the professionals. This has changed. The Zoom H2 Recorder (~$ 150) has four built-in microphones and can record surround sound. Since January 2009 software has been available, which makes it easy to convert the two stereo files which the H2 records into standard surround formats. Here is how to do:
The file 6CH-Sound0.mp3 can be played as surround sound on all computers with a 5.1 channel sound system and Winamp vs.5.5 or later, installed. On other computers it will play as an ordinary MP3 stereo file.

   Alternatively, you can convert the two stereo files into a DTS-WAV file. Note that the DTS encoder doesn't work for all locations of the output folder ( no output file is being created). You can't, for example, choose the folder which contains the source files as output folder. It works fine if you place the output folder on your Windows Desktop. After the DTS file has been created, you can of course move it anywhere you like. You can burn it to an audio CD (not a DVD!) for playback on your home theater DVD player or you can play it back on the VLC player if you have AC3Filter installed (it is included in the Codec Package K-Lite Codec Pack Full).

   You can also encode the two stereo files into a single binaural stereo file for playback through a pair of headphones.

   If you wish to listen to MP3 surround music on the Internet, then download and install this plug-in in your browser. If you don`t want to clutter up your home with a set of surround speakers (and wish to keep peace with your family and neighbors), consider instead buying a pair of surround sound headphones.

How to install M-Tx for writing beautiful sheet music:

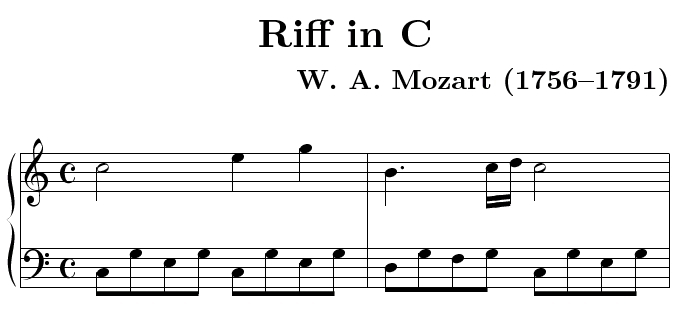
   For most people it is a slow and frustrating job to write sheet music in a graphical note editor program. The good news is that you don't have to. There is a free program called  M-Tx (a frontend to PMX / MusiXTeX) where you only have to specify the content of your music in a text editor, and it will translate it into a professionally looking score ready for publication. If for example you write:

Title:  Riff in C
Composer: W. A. Mozart (1756--1791)
Style: piano

%% Ii1:1
%% w120m
c2+        e4      g     | b4d-  c1 d c2       |
c8 g+ e g c- g+ e g | d g f g    c- g+ e g |

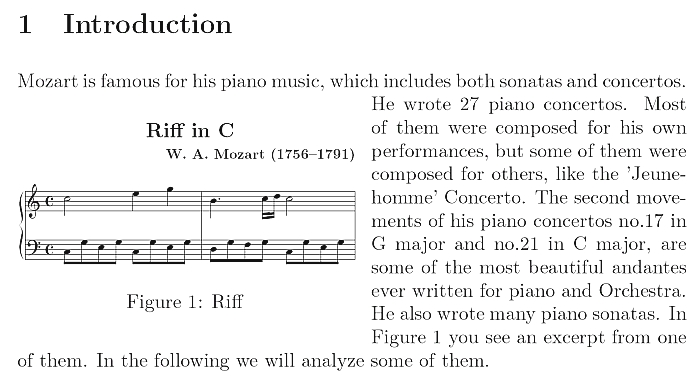
in Notepad or any other text editor, you are rewarded with this score:


and with a MIDI file which you can play for 'proof-listening'. Note that the text source has the same layout as the resulting score. This is the ingenious feature of M-Tx which makes both scripting and proofreading easier than in other 'music from text' processors. M-Tx is particularly well suited for handling lyrics. If you follow the instructions below, all you have to do to get from text to music, is to enter the command  mozart in a Command Prompt.

    Installing MusiXTeX/PMX/M-Tx is not difficult if you use the MusiXTeX package which comes with MiKTeX:
The next step is to install the preprocessors PMX and M-Tx for MusiXTeX. This involves copying a number of files to your TeX system.The easiest and safest way of copying the files is to use a batch file:

for /r %%a in (*.exe) do copy "%%a" "C:\Program Files\MiKTeX 2.9\miktex\bin"
for /r %%a in (*.tex) do copy "%%a" "C:\Program Files\MiKTeX 2.9\tex\generic\musixtex"
for /r %%a in (*.sty) do copy "%%a" "C:\Program Files\MiKTeX 2.9\tex\generic\musixtex"
for /r %%a in (*.mf) do copy "%%a" "C:\Program Files\MiKTeX 2.9\fonts\source\public\musixtex"
for /r %%a in (*.tfm) do copy "%%a" "C:\Program Files\MiKTeX 2.9\fonts\tfm\public\musixtex"
for /r %%a in (*.pfb) do copy "%%a" "C:\Program Files\MiKTeX 2.9\fonts\type1\public\musixtex"
for /r %%a in (psslurs.pro) do copy "%%a" "C:\Program Files\MiKTeX 2.9\dvips\base"


in Notepad and save it as CopyTeX.bat to the directory which contains the files that you wish to copy to your TeX system. You don't have to save CopyTeX.bat to the directory itself, any of its parent directories will do. When you double-click CopyTeX.bat,  it will copy all files with the specified file extensions from the current directory and its subdirectories to the destination directories in your TeX system
   In April 2011 MiKTeX updated their MusiXTeX package to the latest version of MusiXTeX (1.15), but don't expect it to be updated every time a new version comes out. Instead visit the Werner Icking Music Archive which always has the latest version. It is easy to update your MusiXTeX installation:
   To use your TeX system you need a text editor. The text editors WinEdt  and TeXnicCenter both have been designed to work with MiKTeX. In the following we use WinEdt:
   M-Tx is a preprocessor for PMX which in turn is a preprocessor for MusiXTeX.  MusiXTeX is a three-pass system: TeX, musixflx, and TeX again, so all together there are five steps: Instead of entering five commands in the Command Prompt every time you compile your mtx file, you can store them in a batch file:

prepmx %0
pmxab %0
del %0.mx1 %0.mx2
etex %0
musixflx %0
etex %0


Save it as mtx2dvi.bat to the directory C:\ Texoutput.
  If you prefer postscript slurs to the default bitmapped slurs, then add the command: %% Ap in the preamble of your mtx document. Postscript slurs are invisible in DVI viewers. Instead save your score as a pdf document by clicking first dvi-ps and secondly ps-pdf in the Toolbar (it is no use clicking dvi-pdf !)
 
   It is easy and intuitive to write sheet music in M-Tx. If you wish to learn how, then read the User`s Guide 'M-Tx: Music from Text' written by Dirk Laurie, the author of M-Tx. It is included in the muswin distribution as muswin\mtx060-win32\doc\mtx060.pdf. The examples in the User's Guide are included in the muswin distribution as mtx files in the folder muswin\mtx060-win32\examples. Copy them to C:\Texoutput and use them to test your TeX system.  

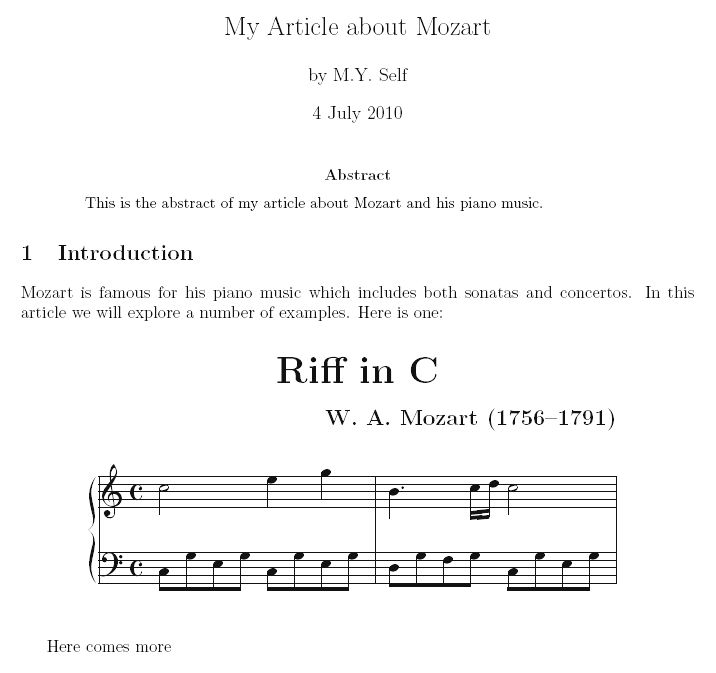
   If you are familiar with the document preparation system LaTeX, you can insert your score in a LaTeX document with the package mtxlatex.sty. It is included in the M-Tx distribution and was installed above. If you don't know LaTeX, then write your article in LyX (described below) and export it as a LaTeX document. Let's say that you are writing an article about Mozart and wish to insert the Mozart score created in the foregoing:

\documentclass[11pt]{article}
\usepackage{etex}
\usepackage{a4wide,mtxlatex}
\mtxlatex
\begin{document}
\title{My Article about Mozart}
\author{by M.Y. Self}
\date{4 July 2010}
\maketitle
\begin{abstract}
This is the abstract of my article about Mozart and his piano music.
\end{abstract}
\section{Introduction}
Mozart is famous for his piano music which includes both sonatas and concertos.
In this article we will explore a number of examples. Here is one:

\begin{center}
\begin{mus}
\input mozart.tex
\end{mus}
\end{center}

Here comes more
\end{document}


and save it as mozartarticle.tex to C:\Texoutput. The lines which insert the Mozart score in the LaTeX document are marked with red color. Note that in the second line etex (extended TeX) is being loaded. This is necessary for the newer versions of PMX/MusiXTeX
MoartArticle
 
   It usually takes some 'tweaking' to obtain good results with mtxlatex. Consult the M-Tx manual for more details. The M-Tx manual itself was created this way and the source file is included in the muswin distribution as muswin\mtx060-win32\examples\mtxdoc.tex. Open it in WinEdt and learn by example how to insert music scores in a LaTeX document (there is no tutorial yet that I know of). Alternatively, you can insert your score as encapsulated postscript. This method  is both easy and flexible and is explained in the tutorial below.  

   As alternatives to M-Tx,  you could consider the programs LilyPond (free) or Mup ($29) which also translate a text source into a music score.

   There is a mailing list where you can ask questions and get help from 'MusiXians' and 'TeXperts'.

How to create beautiful documents with LyX:

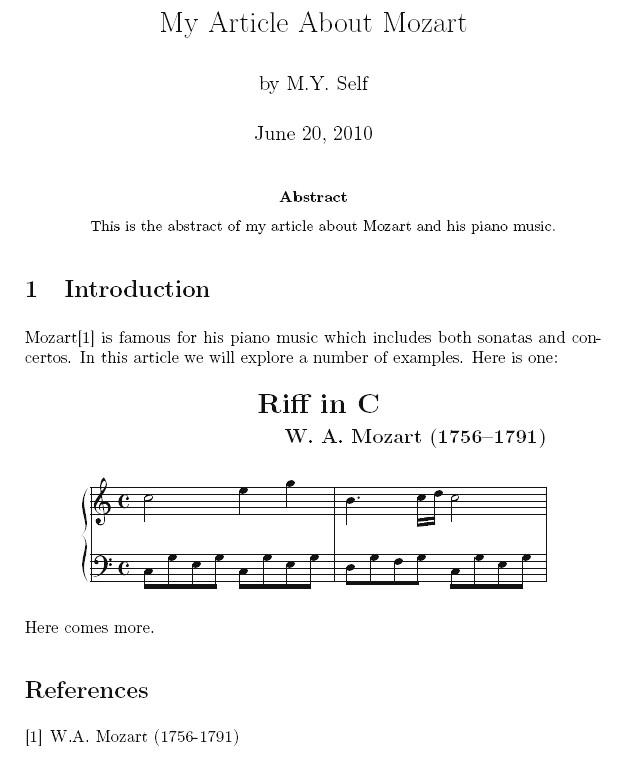
   In the foregoing tutorial you have learned how to typeset sheet music with M-Tx to make a professional looking score. If  you insert it in a text document, you probably wish the resulting document to be of the same high quality. You may think that your favorite word processor does a fine job but your publisher probably won't. The solution is to use LaTeX which is a layout and typesetting program based on the same TeX core as MusiXTeX. LaTeX is a markup language like HTML and not easy to learn. The good news is that you don't have to. With the program LyX which uses LaTeX as its backend typesetting mechanism, you can create a professional looking document without knowing anything about LaTeX. After a period of adjustment, LyX is actually easier to use than a common word processor because it allows you to concentrate on the content of your document rather than its appearance. 

   Let's say that you are writing an article about Mozart and wish to insert the Mozart score from the foregoing tutorial. The first step is to convert the Mozart score into the format encapsulated postscript (.eps):
   The second step is to write the article and insert the Mozart score at the appropriate location: The result should look something like this:


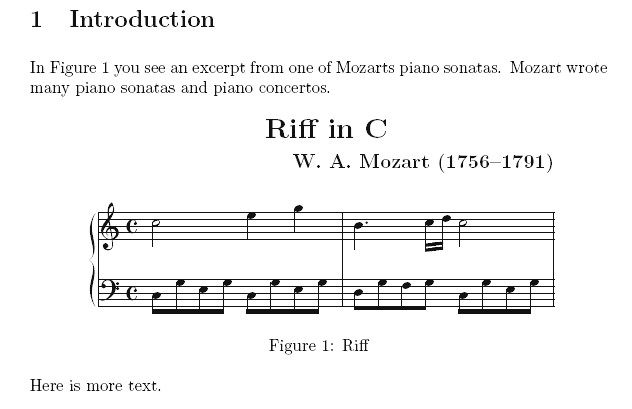
   Unless you have to put the score in a particular location, it is better to insert it in a so-called Figure Float which allows LyX to choose the best location. This makes it easier for LyX to create the optimal layout of your document. You can still influence where it goes by selecting a priority. A Figure Float has the added advantage that you can make a cross-reference to it.
The result should look something like this:


   The third way of inserting the Mozart score is in a so-called Wrap Float which differs from a Figure Float by allowing the text to 'flow' around the score:
The result should look something like this:


  Wrap Floats should not be placed in paragraphs which run over a page break. This means that Wrap Floats should better be inserted when the document is nearly finished and you are able to estimate where page breaks will appear.

    Sometimes you may only want to insert excerpts from your score. This could be for the purpose of musicological discussion or because you need to divide the score in two parts for running over a page break:    If you publish articles in the mathematical sciences where LaTeX is the standard format, you can export your document as a LaTeX document by clicking File->Export->LaTeX (plain).

 LyX 2.0 can natively export XHTML and MathML and import musical notation from Lilypond

 There is a Mailing List for LyX users where you can get help. For inspiration read: Self-publishing with LyX by Alan L Tyree.

How to digitize old gramophone records:

     If you have an old turntable with a preamplifier, you can connect it to your sound card and get the audio into your computer for further processing. More likely however, you have a collection of old vinyl records and no turntable to play them on. Here is how to do:
   If you want to remove, not only clicks but also crackle and hiss from your vinyl record, use a program like Magix Audio Cleaning Lab ($40). If you only want to make a CD copy of your vinyl record and don't want to bother with a computer, buy a turntable CD recorder (~$300) which burns a CD while you play the record (!)

  This site offers an in-depth discussion of digitizing vinyl records and contains many links. The author of the site is willing to answer questions through e-mail.

How to compose an affordable 'music computer':

   There are several things to consider when composing a 'music computer',  price, noise and latency are certainly among them. Since AMD took over ATI they have started to make chipsets with integrated graphics processors that are more powerful than seen before in onboard graphics. Motherboards with these chipsets have become a popular choice for people who wish to build their own cheap HD media center. The ATHLON 64 X2 processors which are compatible with these motherboards are cheap and support the so-called Cool'n'Quiet  technology. For keyboard playing, don't use the onboard sound card but get a sound card with a native ASIO driver and low-latency support. Affordable sound cards of this kind can be found in for example M-Audio's Delta line.

Here is an example of an affordable 'music computer':
All together around $300. Such a computer can be used both as the core of an HD media center and for playing MIDI keyboards with no audible latency. If you are willing to pay more, the sky is the limit.

Note: this was pretty much the state of the art in early 2010. This configuration is still as good as it was back then, but if I was going to build a comparable computer today, I would consider something like:
I would also consider a Solid State Drive (SSD) for the C-drive, for example Samsung 830 Series 128GB Solid State Drive (~$100).
 
This site has a beginners guide to building a Home Theater PC.

How to download and send large files:

   Being a musician, you often have to download and to send large files for the simple reason that media files tend to be bigger than other files. When trying to download large files, you can encounter two kinds of problems: that the file server is too slow or that the connection to the server is being interrupted. Most browsers can't cope with these problems. The solution is to install a download manager.  Here is how to do:
Free Download Manager will now split the files to be downloaded into a number of smaller sections and download all of them at the same time. In the end it will stitch the sections together to recreate the files. The purpose is to optimize the use of your bandwidth. If (or rather when) the connection to the file server is being  interrupted, Free Download Manager will automatically re-establish the connection and resume the download (so that you can get yourself a good nights sleep).

If you click a download link in your browser, Free Download Manager opens automatically with the URL field filled out.

The E-mail system usually impose an upper limit of about 10 MB for the size of attached files which doesn't amount to much when it comes to audio and video content.  Here is how to do:
The recipient will receive an e-mail notification with a download link. You can send files up to 2 GB.

How to charge people for your CD`s or sheet music:

   If your web host offers e-commerce, you can join it for a monthly fee. For a website with a small turnover it may be a better idea to use one of the Internet payment systems like PayPal. These payment systems are in fact an overlay on existing credit card structures. Your customers pay with their credit cards to PayPal without having to share their financial details with you. Subsequently you can transfer the money from your PayPal account to your bank account. Here is how to do:
How to password protect a page with JavaScript:

   Maybe you want to restrict public access to some of your material, for example for copyright reasons. The simplest way of password protecting a page is to use the file name of the page as password and to make sure that it has no incoming links and is stored in a directory which contains a page called index.html. This method exploits the two facts that 1) search-bots (both good and evil ones) find pages by following links and; 2) if a directory contains a page called index.html, the server doesn't send a listing of the contents of the directory but sends index.html instead. In this tutorial we shall add two features to this method. First, we hide the URLs of the secret pages from the browser's address bar by opening them in an iframe. This reduces the risk that users 'bookmark' the pages and inadvertently leak the URLs to the public. Secondly, instead of letting the page with the same name as the password be the protected page, we use it to redirect users to the protected page. This serves the double purpose of blocking the 'password page' from the browser's session history and to make it possible to change the URLs of the secret material without changing the password (and bother the users).

Here is an overview:

MyPublicDirectory ->
index.html (login page)
MyPassword.html
no_javascript.html
MySecretDirectory ->


index.html (blank)
MySecretPage.html       
     secret files

A user who clicks on a public link to MyPublicDirectory, is directed to the page index.html where he can log in with his password. If he enters the correct password: MyPassword, he is directed to the page MyPassword.html. From here, he is automatically redirected to the protected page MySecretPage.html where he can access your secret files. If he types a wrong password (that is, a word which is not the file name of a page), he will receive a message like: 'The requested URL /MyPublicDirectory/TypedWord.html was not found on this server'. The important page MyPassword.html which redirects users from the login page to the  secret page, is protected by having no incoming links and being stored in a directory which contains an index.html file. It contains a script with the command replace which blocks it from the browser's session history and prevents other users of the same computer to retrieve the password. The login page index.html opens an iframe in which all subsequent pages are being loaded with their URLs hidden from the browser's address bar. This reduces the risk that users 'bookmark' the secret pages and inadvertently leak their URLs to the public. As a precaution, you can change the URLs of the secret material as often as you wish, simply by changing the name of the secret directory and without affecting the users.
 
   To see how it works, click the link: http://pandea.simplenet.com/MyPublicDirectory and log in with the password: MyPassword (remember that passwords are case sensitive).

   Here is how to do:

<!DOCTYPE html PUBLIC "-//W3C//DTD HTML 4.01 Transitional//EN"
"http://www.w3.org/TR/html4/loose.dtd">
<html>
<head>
<meta content="text/html; charset=UTF-8" http-equiv="content-type">
<style type="text/css">
html {
overflow: hidden;
}
html{height:100%; }
body{height:100%; }
</style>
<title></title>
</head>
<body>
<noscript>Remember to enable JavaScript in your browser. Click <a href="no_javascript.html"><b>here</b></a> to learn how.</noscript>
<script type="text/javascript">
function CheckPassword() {
    var password = document.login.password.value,  iframe_url = password + '.html';
    document.write('<iframe src= " ' + iframe_url + ' " width="100%" height="100%" frameborder="0"><\/iframe>');
}
</script>
<form method="get" action="no_javascript.html" onsubmit="CheckPassword();return false;" name="login" id="login">
<pre>
Password: <input name="password" type="password"> <input value="login" onclick="CheckPassword();return false;" type="submit"><br>
</pre></form>
</body>
</html>


in Notepad and save the file as index.html to MyPublicDirectory. This is the login page which has an input field for typing the password and a login-button. A user who clicks on a link to MyPublicDirectory, is directed to this page. If he types MyPassword in the input field, he will be directed to the page MyPassword.html. If he types another word, he will receive the message: 'The requested URL /MyPublicDirectory/TypedWord.html was not found on this server'. If he has JavaScript disabled, he will receive the friendly warning:  'Remember to enable JavaScript in your browser. Click here to learn how'. This warning contains a link to the help page no_javascript.html. If he ignores the warning and tries to log in anyways, he will be directed to the page no_javascript.html

<!DOCTYPE html PUBLIC "-//W3C//DTD HTML 4.01 Transitional//EN" "http://www.w3.org/TR/html4/loose.dtd">
<html><head><meta content="text/html; charset=UTF-8" http-equiv="content-type">
<meta content="text/html; charset=UTF-8" http-equiv="content-type">
<meta name="robots" content="noindex">
<script type="text/javascript">
location.replace("MySecretDirectory/MySecretPage.html");
</script>
<title></title>
</head>
<body>
</body>
</html>


in Notepad and save the file as MyPassword.html to MyPublicDirectory. This page will automatically redirect users to the secret page MySecretPage.html while remaining invisible itself

<meta name="robots" content="noindex" />


in the 'head' section of the page, that is anywhere between the tags <head> and </head>. This will prevent 'friendly' search-bots from indexing the page. Since MySecretPage is protected by being stored in a directory with an index.html file and having no incoming links (except the one from MyPassword.html), this is only meant as an extra precaution in case one of the users leaks the URL to the public
   Trusting souls can download the directory tree shown above as the zipped archive MyPublicDirectory.zip (4 KB). Right-click here and select Save Target As. Unzip it with a zipping utility like 7-Zip (free). After having customized the file names, you can upload the whole tree to your server with a single click.
   
Be careful with clickable URLs on your secret page that point to other websites. If a user clicks on such a link, their browser sends the referrer URL to the destination webpage and if it has publicly viewable stats (many do), search engines spider that and follow the link back to your page.

 Remember to give MySecretDirectory and MyPassword.html obscure names which are not easy to guess. Whenever you change the name MySecretDirectory, remember also to change it in MySecretDirectory/MySecretPage.html in the script in the head section of MyPassword.html.

The URLs of the secret material are not visible in the browser's address bar and can't be 'bookmarked' with a single click, but they can be exposed through a 'right-click menu' in the iframe. The risk, that users would create links in this manner and leak them to the public, is probably small. As a precaution, you can change the name of your secret directory with regular intervals. You don't need to change the password, and the users will not be affected. A good name for the secret directory would be: do_not_create_links_to_the_contents_of_this_directory!_xf27p98w. Then every once in a while, change the last eight characters in the name.

To give each of the users their own password, create multiple copies of the page MyPassword.html with the names PasswordForUser001.html, PasswordForUser002.html and so on. To allow different users to access different files, create secret directories/pages for each of them and replace MySecretDirectory/MySecretPage.html in the redirection scripts with SecretDirectoryForUser001/SecretPageForUser001.html and so on.

   After having studied this tutorial, you will probably ask: how safe is this method of password protection? If you take the precautions recommended in the foregoing, security can only be compromised if an anonymous client/bot is able to list the contents of a directory which contains an index.html page, or is able to view the raw server access log . In this case the server has a serious security problem.

   Alternatively, you can use server-side password protection. Some servers offer a ready made solution.

How to add a spam protected contact form to your website:

   A contact form is an essential part of a website. It can help you to find out how people are using your site and thereby how to improve it. It is easy to find a contact form by doing a Goggle search, but not so easy to find a fully functional one which protects against spam. A popular choice for protecting forms against spam is to use Captcha, which is an image with some characters that your visitors have to type before they can successfully submit the form. It is however a bother for the user, and for a small website it will probably turn most of them off. A simpler method is to give an instruction or ask a question which only a human can understand. Questions like What is the first letter of the alphabet? or What is the name of this website? are easily understood by humans, but meaningless to spam-bots.

   The contact form which we are going to create in this tutorial, looks like the one you see at the bottom of this page and is fully functional. It checks that no field is left blank and that the format of the visitors e-mail address is valid. It also checks if the 'human identification' question has been answered correctly. If one of the validations fails it returns an appropriate error message.

Open your page in KompoZer or any other Web Editor and set the cursor at the place in your page where you want the feedback form to be located. Click Insert -> HTML and paste the text:

<form action="MyFeedbackForm.php" method="post">
<table summary="feedback form" align="center"
border="0" cellpadding="2" cellspacing="2">
<tbody>
<tr>
<td colspan="2" align="center" valign="middle"><b><big>Feedback</big></b></td>
</tr>
<tr>
<td>Name:</td>
<td><input name="name" size="25"  type="text"></td>
</tr>
<tr>
<td>Email address:</td>
<td><input name="email" size="25"
type="text"></td>
</tr>
<tr>
<td colspan="2"> Comments<br>
<textarea rows="15" cols="45" name="comments"></textarea>
</td>
</tr>
<tr>
<td colspan="2"> To avoid spam robots, please answer this question:<br>
What is the first letter of the alphabet? <input name="answer"  size="6" type="text"> </td>
</tr>
<tr>
<td colspan="2" align="center"> <input  value="Send Feedback" type="submit"></td>
</tr>
</tbody>
</table>
</form>

The result should look like the form at the bottom of this page. It is easy to edit in KompoZer, including changing the 'human identification' question: What is the first letter of the alphabet?

Next, paste the text:

<?php
if (strtolower($_POST['answer']) != 'a') {die('Wrong answer');}
$errors = '';
$myemail = 'name@domain.com';
if(empty($_POST['name'])  ||
   empty($_POST['email']) ||
   empty($_POST['comments']))
{
    $errors .= "\n Error: all fields are required";
}
$name = $_POST['name'];
$email_address = $_POST['email'];
$message = $_POST['comments'];
if (!eregi(
"^[_a-z0-9-]+(\.[_a-z0-9-]+)*@[a-z0-9-]+(\.[a-z0-9-]+)*(\.[a-z]{2,3})$",
$email_address))
{
    $errors .= "\n Error: Invalid email address";
}
if( empty($errors))
{
    $to = $myemail;
    $email_subject = "Contact form submission: $name";
    $email_body = "You have received a new message. ";
    " Here are the details:\n Name: $name \n Email: $email_address \n Message \n $message";
    $headers = "From: $myemail";
    $headers .= "Reply-To: $email_address";
    mail($to,$email_subject,$email_body,$headers);
    header('Location: thankyou.html');
}
?>
<!DOCTYPE HTML PUBLIC "-//W3C//DTD HTML 4.01 Transitional//EN" "http://www.w3.org/TR/html4/loose.dtd">
<html>
<head>
<title>Feedback form handler</title>
</head>
<body>
<?php
echo nl2br($errors);
?>
</body>
</html>

in Notepad and save it as MyFeedbackForm.php. Upload it to your server.
Instead of asking a human identification question, you can set up a 'honey trap' for spam-bots by giving this instruction: Please leave this field blank. Leave the answer blank by erasing the a. This method exploits the fact that spam-bots like to fill out all fields, and has the advantage that it requires no action on the part of the user. You could even make the field invisible to a human user with CSS. The hidden field should be named “email” or “url” to trick the bot.

How to play a virtual pipe organ on a MIDI keyboard:

Getting started
   A virtual pipe organ consists of one or more MIDI keyboards and a MIDI pedalboard (also called a bass pedal) which are used to play organ soundfonts stored in a computer. These soundfonts are recorded from a real pipe organ. The simplest virtual pipe organ consists of a single MIDI keyboard connected to a computer, but to simulate the full power of a pipe organ you need two MIDI keyboards and a MIDI pedalboard. It is easy to get a MIDI keyboard at a reasonable price ($100-200), but commercial MIDI pedalboards are very expensive ($1000-2000). Alternatively, you could try to get an old used digital organ with a MIDI OUT interface (you may have to 'MIDIfy' the swell pedal yourself).  You can record your organ music as a wav file by clicking Record in the Toolbar. To record it as a MIDI file see below.

     If your keyboard has no Pistons/Tabs, but more than the five octaves needed by an organ, you can use two 'idle' keys in the low or high register to change stops. The first step is to store your favorite stop combinations (called registrations) in Programs. In the top right corner of the main screen there is a Program spinner which can store up to 512 different settings.
The second step is to configure two keys on the MIDI keyboard to change Program in GrandOrgue:
   To control each single stop from a MIDI keyboard without Pistons/Tabs, use a Touch Screen (very expensive), a Touch Pad (not quite so expensive) or a USB computer keyboard/numeric keypad (cheap). If you use a computer keyboard to change stops, use the keyboard short cuts called ShortcutKey ( = ascii number of the keyboard character) listed in the STOP SECTION of the Organ Definition File for each single stop. They can be edited in Notepad.

   If you find the sound too 'dry', there is a tutorial here which explains how to add reverb (most Virtual Organs are recorded as dry samples).

   If you have problems with latency (the time lag between hitting a key on the keyboard and the sound coming out of the speakers), see below for how to resolve it.

Using MIDI-OX
   If your keyboard has no Pistons/Tabs, but enough 'idle' keys  in the low and high register (27 on a full length keyboard), you can change stops by assigning each stop combination to its own key on the keyboard. This method can be useful if you can't see the computer screen from your keyboard and are afraid of getting lost while leafing back and forth through the Programs as described in the foregoing.

The first step is to store your favorite stop combinations in the Pistons of Grandorgue. There are 30 Pistons above the Swell (the General Pistons) which we can use:
The second step is to configure a set of 'idle' keys on the keyboard for controlling the Pistons. This can be done by 'translating' the MIDI notes which these keys send, into the type of MIDI message which the Pistons expect to receive. The program MIDI-OX (free) can do such a translation (called a MIDI mapping). It works together with the program MIDI Yoke (free), which connects different MIDI applications like a 'virtual cable'.

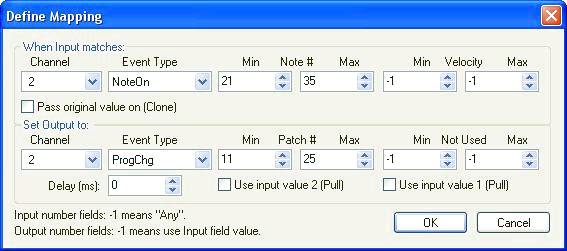
Define Mapping

It says that the note send by key #21 on Channel 2 (the channel of the Great), will be translated into the MIDI message ProgChg with Patch #11 (which Piston 1 can understand). In the same manner, the MIDI note send by key  #22 is translated into a ProgChg message with Patch #12 which Piston 2 can understand, and so forth. The MIDI number of a key is determined by the rule that middle C is always #60. Now we must tell GrandOrgue about what we have done:
   Instead of controlling the pistons, you may find it  more convenient to control each single stop from its own 'idle' key on the keyboard. Unfortunately, this requires a continuous 'NoteOn' message to be send from the key which means that the key has to be pressed down for as long as the stop is active. An experienced organist will tell you the solution to this problem, called the pencil trick: hold down and jam a key with a pencil when you are short of fingers. Here is how to do:

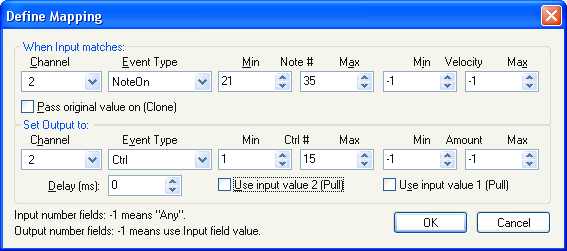
Define Mapping


It says that the notes send by keys #21-35 will be translated into MIDI messages of the type Ctrl with Ctrl #1-15
Now you can select the stops in your stop combination by holding down the corresponding keys and jamming them with pencils (if you are a creative woodworker, you can probably figure out something better than pencils). Since a note has a limited number of  MIDI 'ticks' (a 16 bit integral number), the maximum length of a note is often less than the length of a song, so you may risk that the stops drop out before the end.

   Even if you don't have a Swell Pedal, you may still wish to have some control over the Swell box (POS. EXP. under the Great) from your keyboard:

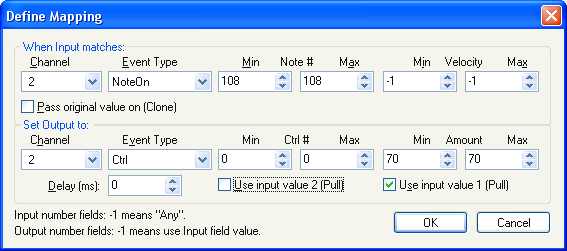
Define Mapping


It says that the note send by key #108 will be translated into a MIDI message of the type Ctrl with Ctrl # 0 and the Amount 70. This message will open the Swell box with the Amount 70. 

By assigning different Amounts, ranging from 0 (closed) to 127 (fully open), to different keys on the keyboard, you can obtain some control over the Swell Box, but not as much as with a real Swell Pedal. Say, if you play with both hands and wish to make a crescendo, it is difficult at the same time to hit the keys that will gradually open the Swell Box. To check that Enclosure 3 is configured correctly, right click on POS. EXP. under the Great and in the pop-up window click Listen For Event. Press key #108 and when the hour glass goes away, click OK.

   You can also use MIDI-OX to record your organ music as a MIDI file and play it back later through GrandOrgue. The advantage of MIDI files is that they are very small and can be edited. Here is how to do the recording:
To play back MyOrganConcert.mid through GrandOrgue do as follows:
   You can read more about MIDI-OX below.

Tuning the pipes       
   You can retune your Organ into various historical temperaments or create new pipes from existing ones with the program Pipe Tune (free). Let's say, that you want to change the 16' stop PedBombarde16 of the  jeux dorgues 2 organ  into an 8' foot stop, by raising the pitch of all the pipes by one octave (I am not suggesting that this is a bright idea, it is only meant as an example!) Here is how to do:

mkdir "Tuned"
PipeTune "*.wav" "Tuned" +1200


in Notepad and save it as Tune+1200.bat to the subdirectory PedBombarde16 under Jeuxdorgues2_GrandOrgue_tuned
Don't try to change the pitch of your pipes in a common sound editor. It will probably erase the loop points and release markers of your samples and render them useless.

Create a subdirectory under My Organs called Pipe Tune for storing copies of  PipeTune.exe, PipeTune.ini and the *.bat files that you have created. This makes it easier to find them and copy them to the folder of a stop that you want to tune
   
Adding stops
   If you add a new stop to the organ, you must also edit the Organ Definition File (called an ODF). On this site there is a tutorial which explains the structure of an ODF. Let's say that you wish to add a stop called  MyNewStop, containing 61 samples named 036-C.wav to 096-C.wav, to the Great. Here is how to do:
An organ definition file is a text file with the file extension .organ which can be opened and edited in Notepad or any other text editor. Open StiehrMockersExtended_new.organ in Notepad and scroll down to [Manual001] (~ line 97). Edit it as shown in the right column below. Changes and additions are marked with red color.
  
Original ODF Edited version of ODF
[Manual001]
Name=GREAT
Comments=
MIDIInputNumber=002
NumberOfLogicalKeys=61
NumberOfAccessibleKeys=61
FirstAccessibleKeyLogicalKeyNumber=1
FirstAccessibleKeyMIDINoteNumber=36
NumberOfStops=10
Stop001=101
Stop002=102
Stop003=103
Stop004=104
Stop005=105
Stop006=106
Stop007=107
Stop008=108
Stop009=109
Stop010=110
NumberOfCouplers=3
................
[Manual001]
Name=GREAT
Comments=
MIDIInputNumber=002
NumberOfLogicalKeys=61
NumberOfAccessibleKeys=61
FirstAccessibleKeyLogicalKeyNumber=1
FirstAccessibleKeyMIDINoteNumber=36
NumberOfStops=11
Stop001=101
Stop002=102
Stop003=103
Stop004=104
Stop005=105
Stop006=106
Stop007=107
Stop008=108
Stop009=109
Stop010=110
Stop011=111
NumberOfCouplers=3
.............

As you see, we have increased the number of stops on the Great from the original 10 to 11, and assigned the number 111 to the new stop.

The next step is to edit the STOP SECTION of the ODF. Scroll down to the end of the STOP SECTION (~ line 1600) and add the text:

[Stop111]
;comment: here you give the new stop a name
Name= MyNewStop
NumberOfLogicalPipes=61
NumberOfAccessiblePipes=61
FirstAccessiblePipeLogicalPipeNumber=001
FirstAccessiblePipeLogicalKeyNumber=001
Comments=
;comment: use the same WindchestGroup as the other stops on the Great, in this case 002
WindchestGroup=002
Percussive=N
DefaultToEngaged=N
DisplayInInvertedState=N
StopControlMIDIKeyNumber=53
;comment: this is for accessing the stop from the computer keyboard.
;065 is the Ascii number of the character 'a'
ShortcutKey=065
;comment: the stops on the main screen of GrandOrgue form a 'grid'
;with 8 rows and 4 columns. At the bottom of the second column there is a vacant place
; at the 7'th row. Here we could put the new stop  
DispDrawstopCol=2
DispDrawstopRow=7
DispLabelColour=Black
DispLabelFontSize=Normal
Displayed=Y
; comment: like the other stops, in this case 2
DispImageNum=2
;comment: here you can adjust the sound volume of the new stop (default = 100)
AmplitudeLevel=100
DispKeyLabelOnLeft=Y
;comment: the paths of the new samples relative to Jeuxdorgues2_GrandOrgue_new
Pipe001=.\GOMyNewStop\036-C.wav
Pipe002=.\GOMyNewStop\037-C#.wav
Pipe003=.\GOMyNewStop\038-D.wav
Pipe004=.\GOMyNewStop\039-D#.wav
Pipe005=.\GOMyNewStop\040-E.wav
Pipe006=.\GOMyNewStop\041-F.wav
Pipe007=.\GOMyNewStop\042-F#.wav
Pipe008=.\GOMyNewStop\043-G.wav
Pipe009=.\GOMyNewStop\044-G#.wav
Pipe010=.\GOMyNewStop\045-A.wav
Pipe011=.\GOMyNewStop\046-A#.wav
Pipe012=.\GOMyNewStop\047-B.wav
Pipe013=.\GOMyNewStop\048-C.wav
Pipe014=.\GOMyNewStop\049-C#.wav
Pipe015=.\GOMyNewStop\050-D.wav
Pipe016=.\GOMyNewStop\051-D#.wav
Pipe017=.\GOMyNewStop\052-E.wav
Pipe018=.\GOMyNewStop\053-F.wav
Pipe019=.\GOMyNewStop\054-F#.wav
Pipe020=.\GOMyNewStop\055-G.wav
Pipe021=.\GOMyNewStop\056-G#.wav
Pipe022=.\GOMyNewStop\057-A.wav
Pipe023=.\GOMyNewStop\058-A#.wav
Pipe024=.\GOMyNewStop\059-B.wav
Pipe025=.\GOMyNewStop\060-C.wav
Pipe026=.\GOMyNewStop\061-C#.wav
Pipe027=.\GOMyNewStop\062-D.wav
Pipe028=.\GOMyNewStop\063-D#.wav
Pipe029=.\GOMyNewStop\064-E.wav
Pipe030=.\GOMyNewStop\065-F.wav
Pipe031=.\GOMyNewStop\066-F#.wav
Pipe032=.\GOMyNewStop\067-G.wav
Pipe033=.\GOMyNewStop\068-G#.wav
Pipe034=.\GOMyNewStop\069-A.wav
Pipe035=.\GOMyNewStop\070-A#.wav
Pipe036=.\GOMyNewStop\071-B.wav
Pipe037=.\GOMyNewStop\072-C.wav
Pipe038=.\GOMyNewStop\073-C#.wav
Pipe039=.\GOMyNewStop\074-D.wav
Pipe040=.\GOMyNewStop\075-D#.wav
Pipe041=.\GOMyNewStop\076-E.wav
Pipe042=.\GOMyNewStop\077-F.wav
Pipe043=.\GOMyNewStop\078-F#.wav
Pipe044=.\GOMyNewStop\079-G.wav
Pipe045=.\GOMyNewStop\080-G#.wav
Pipe046=.\GOMyNewStop\081-A.wav
Pipe047=.\GOMyNewStop\082-A#.wav
Pipe048=.\GOMyNewStop\083-B.wav
Pipe049=.\GOMyNewStop\084-C.wav
Pipe050=.\GOMyNewStop\085-C#.wav
Pipe051=.\GOMyNewStop\086-D.wav
Pipe052=.\GOMyNewStop\087-D#.wav
Pipe053=.\GOMyNewStop\088-E.wav
Pipe054=.\GOMyNewStop\089-F.wav
Pipe055=.\GOMyNewStop\090-F#.wav
Pipe056=.\GOMyNewStop\091-G.wav
Pipe057=.\GOMyNewStop\092-G#.wav
Pipe058=.\GOMyNewStop\093-A.wav
Pipe059=.\GOMyNewStop\094-A#.wav
Pipe060=.\GOMyNewStop\095-B.wav
Pipe061=.\GOMyNewStop\096-C.wav

Comments are written on lines starting with a semi-colon and are ignored by GrandOrgue. They should be self-explaining.

It is easy to change the name 'MyNewStop' into a more descriptive one by using Search/Replace with in Notepad.

Save the new ODF and open it in GrandOrgue. Play the organ and adjust the Amplitude Level of your new stop to obtain a balanced sound.

   As you go on adding new stops to your organ, you will eventually run out of places to put them.. This problem is easily solved by adding another row or column to the grid. Here is an example (changes are marked with red color):

Original ODF Edited version of ODF
[Organ]
HauptwerkOrganFileFormatVersion=1.23
ChurchName=Romanswiller, Eglise protestante (Extended)
ChurchAddress=Romanswiller
OrganBuilder=Stiehr-Mockers
OrganBuildDate=1843
OrganComments=Prepared
RecordingDetails=Recorded 2000
InfoFilename=www.jeuxdorgues.com
NumberOfManuals=2
HasPedals=Y
NumberOfGenerals=31
NumberOfEnclosures=1
NumberOfTremulants=1
NumberOfWindchestGroups=3
NumberOfReversiblePistons=0
NumberOfLabels=6
NumberOfDivisionalCouplers=0
DispDrawstopCols=4
DispDrawstopRows=8
DispDrawstopColsOffset=Y
DispDrawstopOuterColOffsetUp=N
DispScreenSizeHoriz=Small
DispScreenSizeVert=Medium
...........
[Organ]
HauptwerkOrganFileFormatVersion=1.23
ChurchName=Romanswiller, Eglise protestante (Extended)
ChurchAddress=Romanswiller
OrganBuilder=Stiehr-Mockers
OrganBuildDate=1843
OrganComments=Prepared
RecordingDetails=Recorded 2000
InfoFilename=www.jeuxdorgues.com
NumberOfManuals=2
HasPedals=Y
NumberOfGenerals=31
NumberOfEnclosures=1
NumberOfTremulants=1
NumberOfWindchestGroups=3
NumberOfReversiblePistons=0
NumberOfLabels=6
NumberOfDivisionalCouplers=0
DispDrawstopCols=4
DispDrawstopRows=10
DispDrawstopColsOffset=Y
DispDrawstopOuterColOffsetUp=N
DispScreenSizeHoriz=Small
DispScreenSizeVert=Medium

................

As you see, we have increased the number of rows from 8 to 10. If you increase further the number of rows, you may have to increase the height of the Organ. This is done in DispScreenSizeVert which can take on the values: Small, Medium or Large. If instead, you increase the number of columns in DispDrawstopCols, you may have to increase the width of the organ. This is done in 'DispScreenSizeHoriz' which can take on the values: Small, Medium or Large. You can add a label for the new column in the LABEL SECTION of the ODF.

Creating your own organ     
   If you are an organist or have access to an organ, you may wish to record it and create your own virtual pipe organ for playing at home. This is a big project, but not an impossible one. You must choose between recording a dry or a wet sample set. Most organs are recorded as a dry sample set with the microphone placed relatively close to the pipes and then processed afterwards by adding reverb. To record a wet sample set, you simply record the pipes in the same way as you  would record a church concert. The advantage of wet samples is that they preserve the authenticity of the church acoustics. A possible disadvantage is, that the virtual organ will sound like people in the church hear the organ, not like the organist on the bench would hear it. This could be an issue if  the virtual organ is mainly to be used for practicing. On this site you will find an in-depth discussion of dry vs. wet sampling.

The first step is to record the pipes:
If you use the H2 for recording the samples, you may as well do a surround sound recording. Grandorgue only supports stereo, but you can convert the two stereo files recorded by H2 into a single binaural stereo file for playback through a pair of headphones.

The second step is to reduce the background noise:

   The most important reason for reducing the background noise is, that when in GrandOrgue you play several notes at the same time, the background noise (mainly blower noise) add together which isn't natural. If you wish to have natural blower noise, you must add it as an Effect stop like explained below. Be careful with using the noise reduction tool of a common sound editor. It can do your samples more harm than good. Nick Appleton has achieved fine results for organ samples with his free noise reduction tool 'Noise Reduce'. Here is how to do:

gnp  Noise.wav  NoiseTemplate  /fftsize 4096


in Notepad, and save it as GetNoiseProfile.bat to the working directory NoiseReduction
If you are not pleased with the result, then start over again and increase the number 4096 to 8192, 16384, 32768 or 65536, consult the usage guide (usually, it is only necessary to try with 4096 and 8192 and compare the results).

To reduce noise in the recorded wav files, do as follows:

mkdir Output
for %%X in (*.wav) do nr %%X NoiseTemplate Output\%%X


in Notepad and save it as NoiseReduce.bat to the working directory NoiseReduction
   There are many parameters which can be fine tuned, read about them in the usage guide.

The third step is to extract the notes from the recorded wav files:

You can extract the notes manually (not recommended) or automatically (recommended):
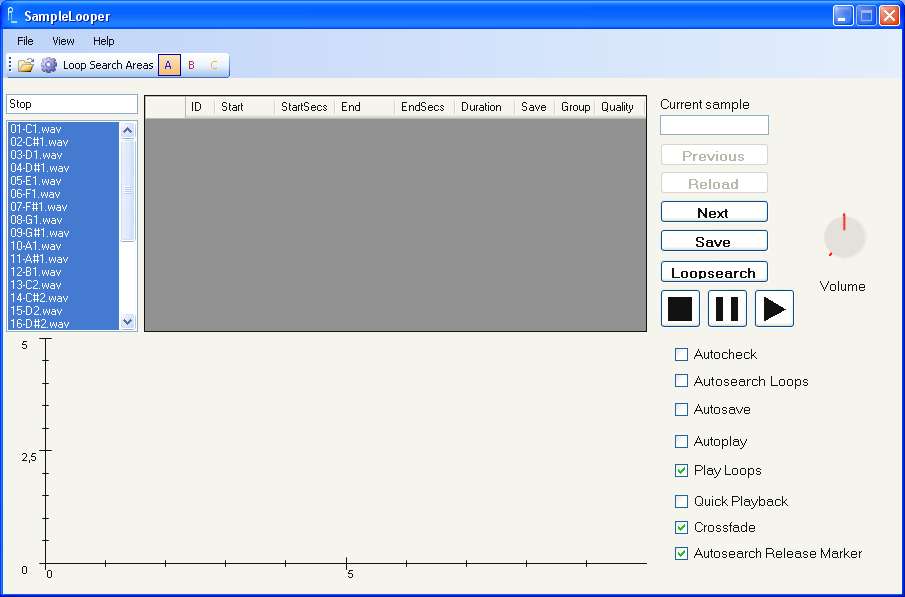
The fourth step is to insert loop points and release markers in the samples:


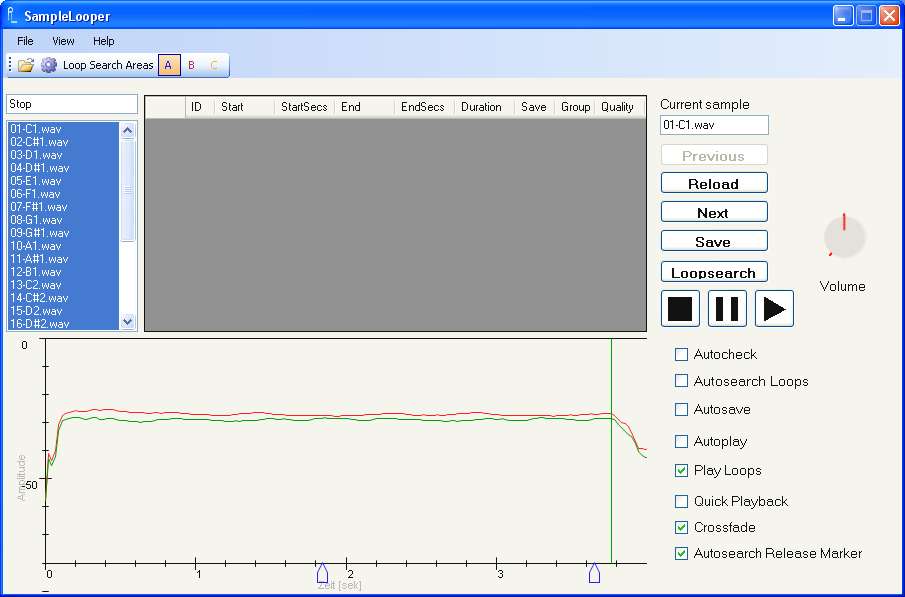
click Next, and the first sample in the list will be opened:


SampleLooper has found a release marker (the green vertical line), because we checked the box Autosearch Release Marker

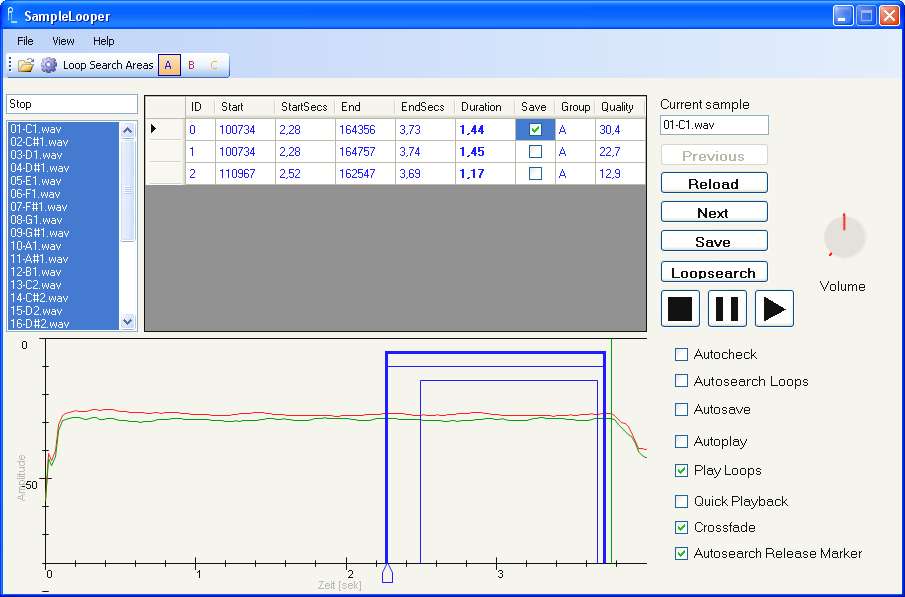
In the Toolbar there are three search areas available for finding loops:  A,B and C. I have disabled B and C by clicking them, so that only one search area A, remains (GrandOrgue only supports one loop per sample). This search area can be adjusted by dragging the two blue range markers at the bottom of the plot window with the mouse. The part of the sample between the last loop point and the release marker will never be played, so to minimize waste, I have chosen the search area to be the last half of the sustain part of the sample.


Loops with a Quality greater than 25 are almost perfect. You can listen to each single loop by selecting it on the list in the main window and clicking the play-button of the audio player. When you have found the best loop, check its Save-box.

For stops with multiple pipes, it can be difficult to find good loops. If you encounter 'unloopable' stops, you could try using Zero-X Seamless Looper ($40) which allows for crossfading to 'smooth out' the loop points.

   We must also check the Release Markers which SampleLooper found:
When you have finished processing your samples, store them in a subdirectory under My Organs called MyOwnOrgan.

As an alternative to SampleLooper you could consider LoopAuditioneer (free)

The fifth and final step is to create an Organ Definition File (ODF) for the new organ:

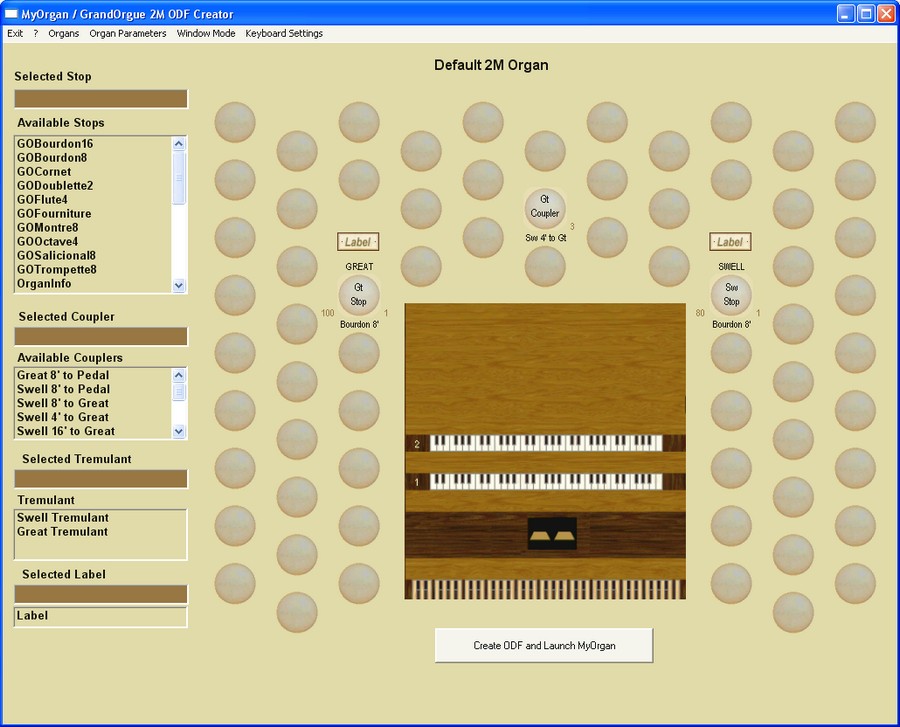
It would be a daunting task to create an ODF by hand. Fortunately the program MoOdfCreator (~$20) can do it for us. To show you an example, I will explain how to create an organ called MyOwnOrgan with two manuals and pedals. Here is how to do:

MoOdfCreator will now create an ODF called MyOwnOrgan.organ, and launch your organ in its built-in version of GrandOrgue called MyOrgan (the original name of GrandOrgue)

   You probably prefer to play your new organ from the directory My Organs where you have access to a newer version of GrandOrgue and where your other organs are stored. To do this, you must copy the ODF to the directory My Organs\MyOwnOrgan\ and edit the paths of the wav files accordingly. The path of a wav file in the ODF created by MoOdfCreator is of the form: .\MO_Stops\PosBourdon8\036-C.wav, whereas in the directory My Organs\MyOwnOrgan\ it should be:  .\PosBourdon8\036-C.wav . We must therefore erase the string: MO_Stops\  from all paths. This is easily done in Notepad:
   MoOdfCreator expects all stops to have the same number of keys (wav files). The default is 61, but you can change this number in  Organ Parameters -> Number of Manual Keys. If one of the stops has fewer keys than the others, then substitute a short silent wav file for the missing keys. You can download a silent wav file here .

   MoOdfCreator can't read an existing ODF, but only create a new one. Instead it reads the .moc file and can therefore only edit organs which it has created itself. MoOdfCreator, however, is so easy to use that it may be worth the effort to 'rebuild' an already existing organ just for the sake of making it easier to edit. In the main directory of  MoOdfCreator there is a file called User Guide V100.rtf which you can consult for further details.

Adding effect stops
   
Many organs have so-called effect stops like 'nightingale', 'glockenspiel' etc.You can create the same type of effect stops in Grandorgue. Any 16 bit/44.1kHz wav file with loop points and a release marker can be connected to a stop in Grandorgue so that it will continue to play for as long as the stop is active. Here is how to do:
   An effect stop must not share its key with any other stop on the same manual. Therefore it is best to add an extra 'invisible' manual to host the effect stops. Jeuxdorgues2_GrandOrgue has three manuals: 000 (Pedals), 001 (Great) and 002 (Swell). We must therefore add a fourth invisible manual 003 (Effect):

[Manual003]
Name=Effect
Comments=
MIDIInputNumber=003
NumberOfLogicalKeys=1
NumberOfAccessibleKeys=1
FirstAccessibleKeyLogicalKeyNumber=1
FirstAccessibleKeyMIDINoteNumber=1
NumberOfStops=1
Stop001=301
NumberOfCouplers=0
NumberOfTremulants=0
NumberOfDivisionals=0
DispKeyColourInverted=N
Displayed=N

Note that we have given the effect stop the stop number 301. To add it to Grandorgue, scroll down to the end of the stop section (~ line 2192) and add the text:

[Stop301]
Name=MySoundEffect
NumberOfLogicalPipes=1
NumberOfAccessiblePipes=1
FirstAccessiblePipeLogicalPipeNumber=001
FirstAccessiblePipeLogicalKeyNumber=001
Comments=
WindchestGroup=001
Percussive=N
DefaultToEngaged=N
DisplayInInvertedState=N
StopControlMIDIKeyNumber=
ShortcutKey=
DispDrawstopCol=2
DispDrawstopRow=7
DispLabelColour=Black
DispLabelFontSize=Normal
Displayed=Y
DispImageNum=2
AmplitudeLevel=100
DispKeyLabelOnLeft=Y
Pipe001=.\Ornaments\MySoundEffect.wav

Note that we have put the effect stop at column #2, row #7 where there was a vacant place. You can change the displayed name MySoundEffect into a more descriptive one.

If you add several effect stops to the Effect manual, they must have different values for FirstAccessiblePipeLogicalKeyNumber. Also remember in [Manual003], to set NumberOfLogicalKeys, NumberOfAccessibleKeys and NumberOfStops equal to the number of effect stops that you have added!

If you create your own organ, you can add natural background noise (blower noise) as an effect stop

Playing Organ MIDI files through GrandOrgue
  
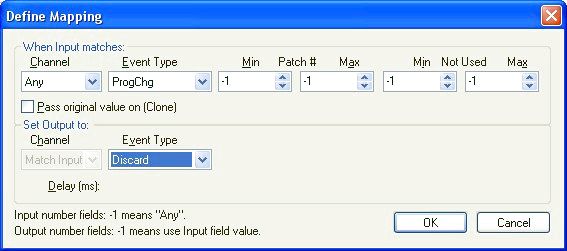
There are many sites on the Internet where you can download MIDI files with organ music for free (see below). You can play them in Winamp with your own soundfonts as explained above, but it is a much greater experience to play them through GrandOrgue where you have access to a variety of stops of high quality. Let's say that you have downloaded the organ MIDI file bach562.mid and wish to play it back through GrandOrgue. First, create the chain: MIDIBar -> MIDI Yoke: 1 -> MIDI-OX -> MIDI Yoke: 2 -> GrandOrgue: Then play the file: You will probably see the keys in GrandOrgue light up with red borders showing that it is receiving the notes, but the stops you selected are instantly closed so there is no sound (at least in GrandOrgue 0.1). If you reopen the stops, you will hear the organ but after a short while they close again. This behaviour is caused by ProgChg MIDI messages in the MIDI file which are meant to instruct a MIDI synthesizer to play an organ. GrandOrgue, however, doesn't need to be told that it is an organ (!) and instead a ProgChg message triggers one of the general pistons above the swell. This will close the stops you selected manually and instead open the stops you assigned to this piston. If you didn't assign any, no stops will open and there will be silence. We can use MIDI-OX to discard these messages:


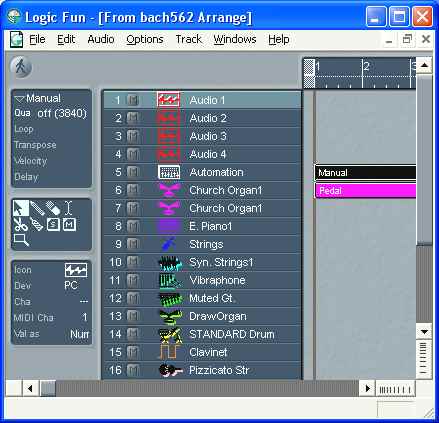
  Now the stops are working, but it is easy to hear that bach562.mid doesn't conform with the normal settings in GrandOrgue: Great: channel 2, Swell: channel 3, Pedals: channel 1. To find out how the manuals in bach562.mid are configured, open it in a MIDI sequencer: 


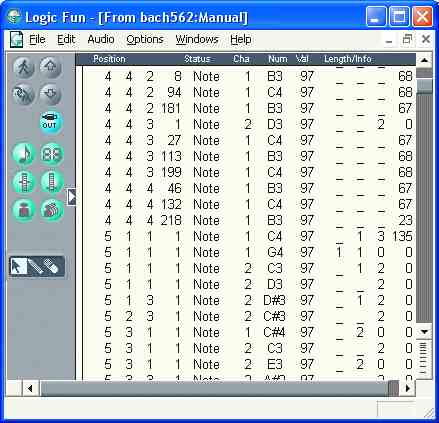
There are two tracks called Manual and Pedal.  Since there is only one manual, we will use it as the Great in GrandOrgue. To see which MIDI channels it uses, select it and open the Event List by clicking Windows -> Open Event List:


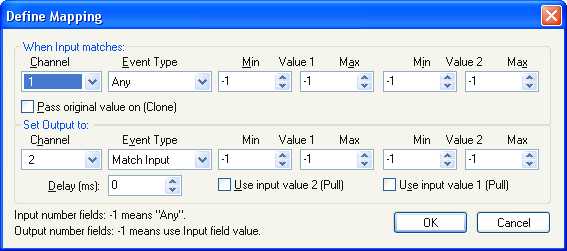
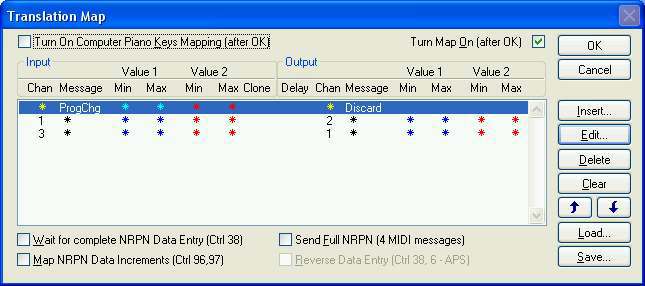
As you see, it uses both channel 1 and 2. Since the Great in GrandOrgue uses only channel 2, we must map channel 1 to channel 2. This is easily done with MIDI-OX by filling out Define Mapping like this:


It says that everything received on channel 1 is send out on channel 2.
     
   When you open the Pedal track in the Event List, you will see that the pedals in bach562.mid use channel 3. Since the pedals in GrandOrgue use channel 1, we must map channel 3 to channel 1 in the same way as just shown. Remember that the ProgChg mapping has a higher priority than the channel mappings and therefore must be put at the top of the mapping list in MIDI-OX:


Instead of mapping bach562.mid with MIDI-OX every time you play it, you can record it once and for all with MIDI-OX as explained above. This will create an edited version of bach562.mid which can be played in any MIDI application connected directly to GrandOrgue. It is both easy and safe to use MIDIBar as explained above Don't use Logic Fun or any other sequencer from the 'Logic family' for this purpose, since they tend to create feedback loops when connected to MIDI Yoke.

   The easiest way of inserting stop changes and adjusting the Swell Box in the MIDI file, is to activate them from your MIDI keyboard while you play the file. By merging these two MIDI streams and recording the resulting stream, it is easy to create an edited MIDI file with your own registrations. Here is how to do:

First, create the chain MIDIBar -> MIDI Yoke:1 -> MIDI-OX(1) -> MIDI Yoke: 2 -> MIDI-OX(2) -> MIDI Yoke: 3 -> Grandorgue :
Then do the recording:
   Alternatively, you can insert stop changes/adjust the Swell Box by editing the MIDI file in Logic Fun. The stops can be changed by inserting ProgChg MIDI messages in the Event List. If you do this, remember to delete the ProgChg -> Discard mapping that we created in the foregoing! Here is how to do: 


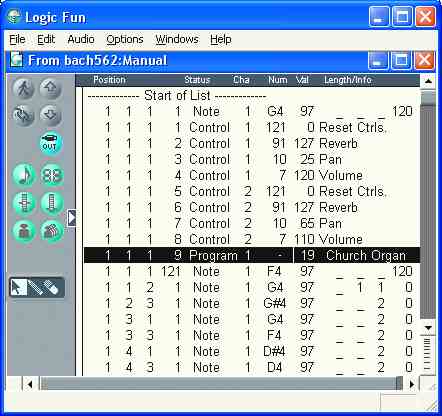
the highlighted line is a ProgChg MIDI message which tells a MIDI synthesizer to play a Church Organ. Instead we are going to edit it, and use it for changing stops in GrandOrgue

The number 19 in the column Val is the Patch # of the ProgChg message (it stands for MIDI instrument # 20: Church Organ). We shall change it to the Patch # which Piston 1 above the Swell (one of the General Pistons) expects to receive. Right-click Piston 1 to see which number this is. If you use the default settings it probably says Data: 12. This actually corresponds to Patch #11 because the Pistons in GrandOrgue use the MIDI numbers 1-128, whereas the Event List in Logic Fun uses 0-127 (there exist two different conventions for MIDI numbers)
   You can also insert MIDI messages in your MIDI file for opening the Swell box in GrandOrgue:


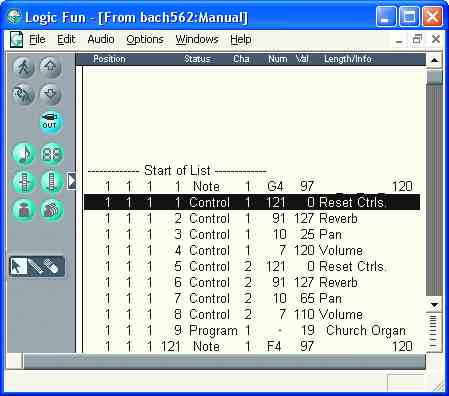
The highlighted line is a Ctrl MIDI message which can be edited and used for controlling the Swell Pedal POS. EXP. below the Great in GrandOrgue. The number 121 in the column Num is the Ctrl # of the MIDI message. We shall change it to the Ctrl # which the Swell box (Enclosure 3) expects to receive. Right-click the Swell Pedal POS. EXP. to see which number this is. If you use the default settings it probably says Data: 0. Unlike the Pistons, the Swell box uses the same MIDI numbers 0-127 as the Event List, so Data: 0 corresponds to Ctrl #0 The two methods of inserting registrations in a MIDI file can be combined. First, create a rough registration from your MIDI keyboard. This is fast and easy. Secondly, open the MIDI file in Logic Fun and fine tune the registrations (maybe you didn't  change stops at exactly the right place)

Latency
    If you have problems with latency (the time lag between hitting a key on the keyboard and the sound coming out of the speakers), then try to use ASIO drivers. If ASIO drivers don't work on your system, then use Direct Sound. Most sound cards support ASIO4ALL. If yours doesn't, then here is a selection of sound cards which natively support ASIO. To optimize ASIO drivers in Windows XP, change the Processor Scheduling to Background Services: go to Control Panel ->System -> Advanced -> Performance settings -> Advanced and click Background Services. You could also try to lower the size of the audio buffer. Above, you will find an example of a low-cost low-latency system.

If you have been running ASIO4ALL and change to a sound card with native ASIO drivers, remember to uninstall ASIO4ALL. Otherwise it will start automatically every time you open your ASIO application.

   If you experience audio glitches, try temporarily disabling wireless network adapter devices. They are a common source of audio performance problems. You can also consult this guide, or use the program DPC Latency Checker (free) to help to find the cause of interruptions in the audio stream.

Links
    There are other free organs besides the Stiehr and Mockers Organ.  Here is a selection:
 For a modest price you can get the Kitchener Organ (15 € ) and the Pibrac Organ (35 € ), both of high quality. I strongly recommend you to get the Kitchener Organ.

Here are some sites where you can download free Organ MIDI files:
   On this site you can buy some of James Pressler's Organ MIDI files which are designed for use with MIDI Organs ($25 for 50 Baroque Organ Works or $99 for The Complete Organ Works of J.S. Bach). You can map them with MIDI-OX to suit GrandOrgue like explained above.

  GrandOrgue can also be used to play virtual harpsichords. 

  There is an organ forum for virtual pipe organs where you can get help.


If you wish to see examples of streaming MP3`s and Flash videos created with the tools presented above, then visit this site

The Organ of Ruts Church, Bornholm

Feedback
Name:
Email address:
Comments
To avoid spam robots, please answer this question:
What is the first letter of the alphabet?
Last updated May 30th, 2012

Valid HTML 4.0 Transitional

Validated by HTML Validator (based on Tidy)